

The HOTTEST Place in Town for BBQing!
Saturday, December 28, 2013
Friday, December 27, 2013
Wednesday, December 25, 2013

Tuesday, December 24, 2013
What you should prepare for Christmas Eve tonight...
Smoked Honey Glazed Ham

Have today off? Well perfect, go ahead and cook this for dinner tonight on your grill. Who doesn't love ham? This is a great way to take a regular cooked ham and turn it into something spectacular by applying a spicy rub and placing it in a smoker. Let it smoke for a long while and it will taste great.
Prep Time: 30 minutes
Cook Time: 6 hours
Total Time: 6 hours, 30 minutes
Yield: Serves up to 12
Ingredients:
- 1 6 pound "ready to eat" ham
- 1 cup pineapple juice
- 3/4 cup chicken stock
- 1/2 cup honey
- 1 1/2 tablespoon vegetable oil
- 1 tablespoon black pepper
- 1 tablespoon paprika
- 1 tablespoon sugar
- 1/2 tablespoon salt
- 2 teaspoon dry mustard
- 1/2 teaspoon cayenne
- 1/2 teaspoon ground cloves
Preparation:
The night before you smoke, mix together the pepper, paprika, sugar, salt, 1 teaspoon of dry mustard and cayenne. Rub over the surface of the ham, wrap in foil and let sit in the refrigerator overnight. In the morning remove the ham from the refrigerator and let it sit for 1 hour. Remove foil. In the meantime prepare the smoker. You will be smoking at about 210 degrees F. for 6 hours. Mix together the chicken stock, 3/4 cups of pineapple juice, vegetable oil, 1/2 teaspoon dry mustard, and cloves. Warm over medium heat until completely mixed. Place ham in smoker and baste with sauce once every hour. While the ham is smoking, prepare the glaze by mixing together the honey, 1/4 cup on pineapple juice, 1/2 teaspoon dry mustard and a pinch of ground cloves. Brush generously with glaze a couple of times during the last hour of smoking.
Monday, December 23, 2013

Sunday, December 22, 2013
Sunday's Appetizers
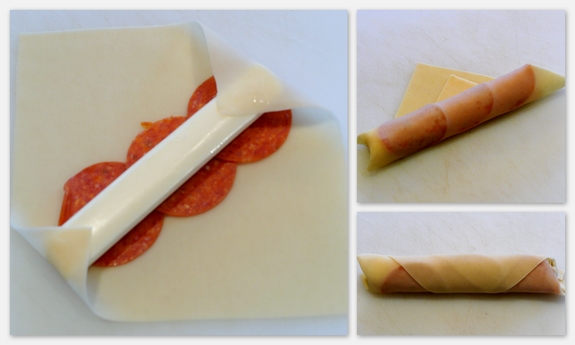
Fried Mozzarella Pepperoni Sticks

Fried Mozzarella-Pepperoni Sticks ~ Made EasyServes 6
12 pieces of string cheese
12 egg roll wrappers
36 slices of pepperoni
Oil for deep-frying
Marinara or pizza sauce
On top of an egg roll wrapper, place three pieces of pepperoni as shown in the picture. Place a piece of string cheese on top. Fold corners over cheese. Fold bottom corner over cheese and pepperoni and keep rolling until cheese is tightly sealed. Moisten corners with water to seal. Repeat with the rest of wrappers, cheese and pepperoni.
In a skillet, heat oil to 375o F. Fry sticks, a few at a time, for 30-60 seconds on each side until completely brown. Drain on paper towels. Serve with sauce
Saturday, December 21, 2013
Saturday Snapshot
On Saturdays, we will start posting candid photos of Just Grillin events in the store and out into the community!
Post 1: Some Customers grabbing some goodies this past Saturday

Post 1: Some Customers grabbing some goodies this past Saturday

Friday, December 20, 2013
Thursday, December 19, 2013
Holiday Hours!
We have something cool in store for you! Today we are extending our hours for the Holiday Season. Check the schedule below to see our new Holiday Hours for the rest of 2013!
.jpg)
.jpg)
Wednesday, December 18, 2013
Top Grilling Gifts to get your guy this Christmas
Christmas is less than a week away and are you prepared for gift giving? Below we have compiled a great list of items to pick up in our store before Christmas next week!
1 LooftLighter
The original Looftlighter is a Swedish, patented, environmentally friendly invention that ignites charcoal, briquettes, wood, hardwood, pellets, heat beads etc. in 60 seconds without any use of lighter fluid or other chemicals.


2 Pizza Stone with Thermometer
Monitor your oven or grill's temperature and create a consistently-heated baking surface with this cordierite stone with stainless steel base and built-in thermometer. The removable 15" x 15" cordierite pizza stone helps to eliminate hot spots while cooking, and produces uniformly browned crust; it's also great for heating or reheating ready made or frozen foods
3 Grillfloss
 The brush can't reach the sides or bottom of the grill, leaving harmful gunk that gets cooked into your next meal. Like dental floss, Grillfloss cleans where brushes can't, the underside of the grill grates. With a simple push, turn and pull, Grillfloss wraps around each grill rod, cutting through the toughest caked-on grill gunk. Unique design includes a Dual Sized Cleaning Head¿ for small and large round grill grates, a 22-inch long handle to reach all areas of a hot grill, and stainless steel construction that will outlast any brush.How to Grillfloss:Push. Push forward, cleaning the top and both sides. Turn. Turn until the cleaning head wraps completely around the grill grate.Pull. Pull back shaving off all remaining grill gunk from the bottom of grill-grate.
 4 Bear Paws
Bear Paws are like an extension of your own hands. Made from hard, durable plastic, they are perfect for lifting hot food items from the pan to the platter. Securely holds food while carving. Perfect as a meat shredding tool.

Designed to hold an impressive 3/4-pound of ground meat, the Stuff-A-Burger Press can be filled with an infinite variety of flavor combinations. Try it with grated cheese, grilled onions or mushrooms.
Thursday, December 12, 2013
Prepare your Fireplace Properly for the Holidays
With these 5 steps, you should be able to get the most out of your fireplace this winter, even in Florida!

1. Prepare your wood properly
“Before burning firewood, be sure it is properly dried and seasoned,” the EPA suggests. “Wet wood can create excessive smoke which is essentially wasted fuel.”
If you’re cutting firewood yourself, the EPA recommends following four simple steps to make sure your wood is dried properly:
- Split: Split wood in a range of sizes to fit your stove, but do not cut pieces that are larger than 6 inches in diameter to ensure proper burning.
- Stack: Stack wood split-side down and off the ground to allow air to circulate around the wood.
- Cover: Cover the top of the stacked wood with a heavy-duty tarp to protect it from rain and snow.
- Store: Store wood for a minimum of 6 months for softwoods and 12 months for hardwoods.
To test the moisture level of your firewood, consider using awood moisture meter, which can cost as little as $20 and save you loads of money in the long run. Properly dried wood should have a moisture reading of 20 percent or less, the EPA says.
2. Source your wood locally
If you’d rather not store wood in your yard for up to a year before using it, another option is to purchase firewood from a distributor in your area. Always remember to shop locally and request only dry, seasoned wood, the EPA suggests.
In addition to cutting down on the carbon footprint of your firewood, buying locally also ensures that you are in compliance with state and local ordinances, which may restrict out-of-state firewood.
“Many states have firewood movement restrictions and/or out-of-state quarantines due to invasive pests,” the EPA says. “For example, New York and Maine have regulations that prohibit the import and transportation of firewood unless the wood is treated under the USDA’s heat treatment standards. Homeowners should check their state and local ordinances for more information.”
3. Learn before you burn: Starting your fire
Starting a fire in your fireplace may sound simple, but there is actually a very specific way to build a strong-burning fire that creates more warmth with less wood. Here are three simple steps to help you do it right:
1. To begin, start a small fire with dry kindling then add a few pieces of wood. Give the fire plenty of air by fully opening the air controls until it is roaring.
2. Burn the fire to heat the chimney or flue before adding more wood
3. Keep space between the firewood as you add more, and maintain a bright, hot fire – don’t let it smolder.
To maintain proper airflow, regularly remove ashes from your fireplace, put them into a metal container with a cover and store it outdoors. Never burn garbage, cardboard, treated lumber or plastics as these items can damage your stove and cause serious health issues, the EPA says.
4. Getting the most from your fire: Circulate that toasty air
As most fireplace-users know, the warmth from your fire tends to stay in the area immediately around your wood-burning appliance – rather than circulating efficiently through the home. Take a few simple steps to help hot air spread more effectively, and you’ll notice a much more comfortable living space.
“To help move trapped hot air near the ceiling, run ceiling fans counterclockwise on low speed,” the EPA suggests. “This helps redirect warm air from the ceiling down the walls and into the living space.”
Improving the insulation in your home can also increase comfort levels and prevent your cozy warm air from going to waste. Check out these quick and easy tips from the EPA’s Energy Star program to help you weatherize your home and improve efficiency.
5. Maintain your fireplace and replace it as necessary
“Make sure to have a certified chimney sweep annually inspect your wood-burning appliance and chimney for any gaps, cracks or creosote build-up,” the EPA advises. “A clean chimney provides good draft and reduces the risk of chimney fires.”
If you burn wood to heat your home, the EPA encourages using the cleanest wood-burning appliance possible. So, if you need to upgrade your fireplace, consider opting for an EPA-certified wood stove or fireplace insert, which produce less smoke, minimal ash and burn more efficiently than older uncertified models. A properly installed and operated certified wood stove should produce little smoke inside or outside the home.
For even more tips to help you save money on fireplace heating and build a stronger, better and more efficient fire, check out the Burn Wise program’s Best Burn Practices.
Wednesday, December 11, 2013
Baking on the Grill?
Yes indeed you can bake on the grill! Even your Holiday favorites like cookies, breads, pies, and cakes. Below are some tips for when you bake on your grill!
Bread

Yes you can make bread with your grill. Flat breads are a breeze and even raised breads work great. All you need to bake bread is an enclosed space that is heated. For this a grill works perfect. One thing to remember though is that grills can get much hotter than your oven and temperature control is not as precise. Delicate breads that can be a challenge in the oven should be avoided on the grill until you really get the hang of it.
Temperatures: My experience suggests that breads cook faster (sometimes twice as fast) on the grill as they would in the oven. Like I said grills can produce a lot more heat than you traditionally use to bake breads so try to keep a relatively low temperature. Use an oven thermometer placed near the bread to monitor temperatures. Also, because of the natural air flow inside your grill (whether charcoal or gas) you get more convection than you do in your oven. This is why it is important to keep a close eye on breads when you are grilling.
Cookies:
When you are cooking your cookies on the grill there are several things that you will want to avoid. It is a good idea not to put any sprinkles or icing on the cooking's while you are cooking them on the grill. Sometimes these things are put on before they are placed in the oven. You will also find that it is not a good idea to put any chocolate chip cookies on the outside grill. The problem with the chocolate chip cookies is that the chocolate portion of the cookies will usually end up burning. In some cases I have found that the chocolate has a very unusual taste to it.
 With cooking on the grill you will find that timing really is everything. Cooking them just a second too long on the grill will cause you to end up with extra hard cookies. You can not use the same timing for the grill that you would use for the oven. The grill and the oven really are two different things. It also depends on how much charcoal you put on the grill. It may take a few trial and error attempts but you will eventually come up with a great way to make some tasty cookies.
Pies:
 Fresh homemade apple pie straight from your grill or smoker is a throwback to the way apple pies were baked in a wood-fired kitchen stove years ago. In a smoker, the sweet smoke from pecan or a fruit wood really weaves through the layers of the pie to add a succulent, mouth-watering flavor profile. Not to mention you'll be able to show off your skills with dinner AND dessert!
This recipe would be best with a homemade crust, but don’t fret it if you’d rather use a store-bought crust. Besides, they don’t say easy as apple pie for nothing. This easy apple pie recipe is as easy and American as apple pie gets.
Apple Pie on the Grill Recipe-
Prep time: 15 minutesCooking time: 35 minutes
Ingredients
1 batch Mom's Homemade Pie Crust or frozen pie crusts (2 crusts)
1 cup sugar
1 tbsp flour
1 pinch salt
2 tsp lemon juice
1/4 tsp cinnamon
1/8 tsp nutmeg
2-3 tsp butter
1 tsp freshly grated Gruyere cheese (highly recommended)
8 fresh Granny Smith apples
1) Set up your grill for indirect grilling at 350-375°F. You can use a pyrex bowl since we’re doing indirect or stove-top dutch oven would also work.
2) Peel the apples – a potato peeler works well. Core and slice the apples into 1/4-3/8ths thick slices (too thick and they won't soften enough). In a large bowl toss the apples with the lemon juice (only use 3 tsp when doubling the recipe). Mix in the sugar, flour and salt. Stir well to coat the apples.
3) Place your pie crusts in the pan and gently pull to bring the edge up out of the pan. Fill with all the apples that will fit to make a heaping mound. Shake to cover the top of the apple filling with cinnamon and nutmeg. Just eyeball to evenly cover. Slice off small chunks of butter and place on top of the filling. It will melt and spread the spices through the pie. Lay the top crust on the pie and press the edges in.
4) Gingerly score the top in several places (don’t cut all the way through). Sprinkle a few pinches of sugar on top of the pie.
5) Place on the smoker/grill in the indirect zone. For wood choice I prefer pecan, but any fruit wood will work (1-2 ounces). Try only an ounce or two. Cook for 30-40 minutes until the crust browns. You should also start to see the filling bubble at the edges when it’s done.
6) Remove from the smoker and let cool. Sprinkle with some finely grated Gruyere cheese. This will melt into the crust to add a bit of savory to the sweetness of the pie. For a simple whipped topping mix 1 cup heavy cream, 1/4 cup sugar and 1 tsp vanilla.
Tuesday, December 10, 2013
We're Back!
After a Busy couple of months we will be sharing the latest updates with you and cool recipes and tips we find. But first... we wanted to wish everyone a Happy Holidays!

Subscribe to:
Comments (Atom)